Unlock the Power of Cross-Platform Mobile Development with React Native
The majority of people use their smartphones or tablets to stay connected with friends and family, browse the internet, shop online, and access various applications. As a result, businesses are focusing on building mobile applications to reach out to their customers and improve their user experience. However, developing a mobile application that works on both iOS and Android can be challenging and time-consuming.
Fortunately, React Native, an open-source mobile application framework, provides a solution for building cross-platform mobile applications. It enables developers to write code once and deploy it on both platforms, saving time and resources. This approach to app development offers significant advantages, including code reusability for both Android and iOS, and comprehensive documentation support for the app development process. In this article, we will provide a step-by-step tutorial on how to build cross-platform mobile applications with React Native.
React Native is a popular choice for mobile app development because it allows for the creation of natively-rendered mobile apps for both iOS and Android. It integrates well with native APIs and appeals to frontend developers who were previously limited to web-based technologies. Additionally, React Native is a great solution for businesses with limited budgets. Many successful products have been built using React Native for app development. By using React Native, developers can manage both iOS and Android apps with a single team, achieving performance improvements and efficient code sharing.
Getting Started with React Native
To begin with, you need to set up your development environment. You will need Node.js, the React Native command-line interface, and an emulator or device to test your application. Node.js is a JavaScript runtime that allows you to run JavaScript code on the server-side. You can download it from the Node.js website.
React Native is a popular framework that allows developers to use JavaScript as a programming language to write applications for multiple platforms, eliminating the need to code separately for iOS and Android.
Once you have installed Node.js, you need to install the React Native command-line interface (CLI) by running the following command:

Now that you have set up your development environment, you can create a new React Native project by running the following command:

User Interface Development with React Native
React Native provides a set of components that you can use to build your application’s user interface (UI). As a JavaScript library, these components are similar to HTML tags but are specific to React Native. Some of the most commonly used components are View, Text, Image, TextInput, Button, and ScrollView.
Using the React Native library, you can efficiently build cross-platform user interfaces with reusable code and simplified UI development.
Let’s create a simple UI for our application. Open the App.js file in your project and replace the code with the following:
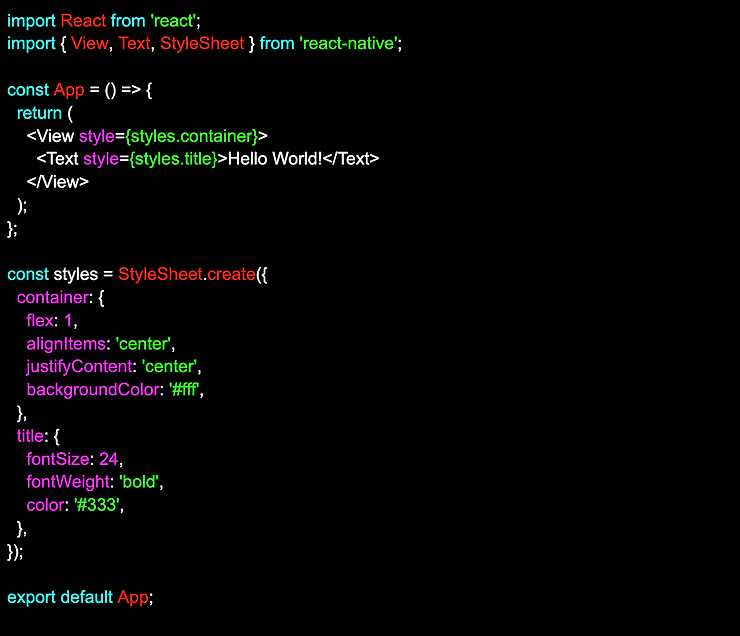
This code defines a functional component called App that returns a View component with a Text component inside it. We have also defined a StyleSheet object to style our components. In this example, we have set the background color to white, the title font size to 24, and the font color to black.
Data Management with React Native
React Native uses the Flux architecture for data management, which is a crucial part of the app development process. The Flux architecture is a unidirectional data flow pattern that consists of four parts: the view, the action, the dispatcher, and the store. The view is the component that displays the data to the user. The action is an object that describes what happened. The dispatcher receives the action and sends it to the appropriate store. The store is responsible for updating the application’s data and emitting a change event.
Using native code can enhance performance and allow for custom features, although it may reduce development speed due to a lack of native modules.
Let’s create a simple data management system for our application. Create a new file called ItemList.js in your project’s root directory and add the following code:


This code defines a functional component called ItemList that retrieves the data from the data.js file using the getAllItems function and displays it using the FlatList component. We have also defined a handleAddItem function that adds a new item to the list when the user presses the "Add Item" button.
Deployment of React Native Apps
Now that you have developed your cross-platform mobile application, it’s time to deploy it to the app stores for both iOS and Android mobile apps. Before you can do this, you need to generate the necessary certificates and keys for iOS and Android.
Cross-platform apps often offer advantages in terms of reduced costs and platform consistency, but it's important to consider that native apps may provide better performance in some cases.
For iOS, you will need to create an Apple Developer account, create an app ID, and generate a provisioning profile and a distribution certificate. You will also need to create an App Store Connect account and submit your application for review.
For Android, you will need to create a Google Developer account, create a keystore file, and sign your application using the keystore file. You will also need to create a Google Play Console account and submit your application for review.
If you don’t want to go through the hassle of deploying your application yourself, you can always count on Invatechs, a software development company with qualified specialists in React Native. Invatechs has years of experience in developing cross-platform mobile applications and can help you deploy your application to the app stores quickly and efficiently.
Conclusion
React Native provides a simple and efficient way to build cross-platform mobile applications. With its UI components and data management system, you can create robust React Native applications that work seamlessly on both iOS and Android. In this article, we have provided a step-by-step tutorial on how to build a simple application using React Native. We have also discussed how you can deploy your application to the app stores or rely on Invatechs for professional deployment services. With this knowledge, you can start building your own cross-platform mobile applications and reach out to a wider audience. The thriving React Native community offers extensive support and resources, making it easier to overcome challenges and improve your development skills.